| |
 |
|

|


|
|
 |
|
How do I use Pine E-mail program?
|
| |
Pine (Program for Internet News & Email) is a simple yet sophisticated,
easy-to-use, text-based e-mail program (=mail user agent - MUA) that was
created at the University of Washington. Pine can be used for sending,
receiving, and filing Internet electronic mail messages and Usenet newsgroups messages. Although
originally designed for inexperienced e-mail users, Pine has evolved to
support many advanced features. (there are an ever-growing number of
configuration and personal-preference options built right in the Pine)
Pine has a number of distinctive useability items built right in such as
On-screen menus that free you from memorizing commands - the available
options are displayed across the bottom of each screen, On-screen
messages that guide/suggest a user when a user action is needed, and of
course, Online help within Pine program.
Bottomline is that even you're new to Pine, you can start using it right
away instead of fighting against it, and Pine is a very stable, robust
e-mail program that can handle various critical functionalities such as
attachment, Usenet newsgroups,
addressbook, telnet access, etc.
Pine supports the following Internet protocols and specifications:
-
| Protocols |
It Means |
| SMTP |
Simple Mail Transport Protocol |
| NNTP |
Network News Transport Protocol |
| MIME |
Multipurpose Internet Mail Extensions.
MIME is an Internet standard which allows transfer
of binary files such as word-processing documents,
spreadsheets, images, sounds, etc. between any MIME-capable
mail softwares. (which is readily available
for most types of computers, although some
proprietary mail systems do not yet support MIME)
|
| IMAP |
Internet Message Access Protocol.
It is a method of accessing electronic mail
or bulletin board messages that are kept on a
(possibly shared) mail server. In other words,
it permits a "client" e-mail program to access
messages stored in a remote server as if they
were local.
|
|
Well, sounds too good so far. However, a "mail user agent"
such as Pine is just one part of a Unix messaging system.
Here are some boundary conditions - things that can not be done
by Pine, but require other programs;
- Automatic forwarding of e-mail messages to
different accounts. (see
forward)
-
Actual relaying of e-mails that can be done only by the system
"message transfer agents."
-
Delivery filtering such as automatically sorting and putting
incoming e-mail messages into different folders.
-
Vacation message handling
such as automatically responding to incoming e-mail during your absence.
-
Anything to do with "talk" which has nothing to do with e-mail.
-
Anything to do with "irc" (or chat) which has nothing to do with e-mail.
-
List processing such as resending and distributing one message
to a list of recipients.
|
|
Important Tips on Using E-mail
|
| |
Electronic mail is a unique medium of communication. Messages can
be replied to or forwarded with speed and ease, and e-mail has
the potential to reach a wide audience. These features can also
be misused. There are a few basic guidelines for the
sensible use of e-mail that can help you avoid common mistakes
while you enjoy the full benefits of this technology.
The privacy of an email message cannot be guaranteed. An email
message may be forwarded, printed, or permanently stored by
any recipient. E-mail can be misdirected, even when you are
careful. Do not put something in an e-mail message that you
would not want read by everybody. And if you receive a message
intended for someone else, let the sender know.
E-mail does not show the subtleties of voice or body language.
Avoid attempts at irony or sarcasm. The most effective e-mail
is short, to the point, clear, and relevant. If you receive
an e-mail message that makes you upset, do not respond immediately,
and in any case, avoid "flaming," that is, sending an angry or
rude message.
As you use e-mail, keep the following tips in mind:
- E-mail is meant for informal correspondence
as well as scholarly, scientific, and clinical
communications. You should not use e-mail for
official record purposes where a memo would
be required (e.g., personnel actions,
organization changes, contracts, and
policy statements).
- E-mail should not be considered private.
Confidential information should not
be sent by email.
- Because e-mail is informal correspondence, you
should regularly delete your old email files.
This will help save resources and it will
help you to keep your mailbox organized.
- E-mail replies may go to more people than you realize.
When replying to a message be sure to look at the
list of recipients, especially addresses of
mailing lists, which may redistribute your
message to dozens or hundreds of individuals.
- E-mail can be junk mail. Each recipient gets to
decide if a message is "junk," so avoid
unnecessary proliferation of messages.
If you repeatedly receive unwanted e-mails,
there are
a few things you can do about it.
- The integrity of an e-mail message cannot be
guaranteed. If a received message seems out
of character for the sender, double-check
before taking it seriously.
- E-mail is easily forwarded to someone else. Although this
is convenient it is not always appropriate. If you
are unsure, ask the sender before you forward a
message.
|
| |
To start Pine, type at the system prompt:
-
$ pine
or with a recipient's e-mail address
-
$ pine jonny@xyz.org
to directly start composing an e-mail to "jonny@xyz.org" e-mail address
without using the initial Pine menu. You can also use a valid CEE Unix
network user ID, i.e., typing 'pine yoon' is equivalent to 'pine yoon@cee.odu.edu,'
or use an alias defined in your Pine Addressbook.
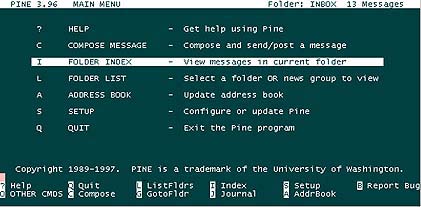
Once Pine begins, and the Main Menu screen appears as shown below. Each Pine screen
has a similar layout: the top line tells you the screen name and additional
useful information, below that is the work area (on this screen, the work area
is a menu of options), then the message/prompt line (on this screen, the line
starts with a pink square prompt), and finally the menu of commands.
The Main Menu lists Pine's main options. The key you need to type
to enter your choice are to the left of each option or command name.
These keys are not case-sensitive, and you can type either
uppercase or lowercase letters. Since Pine will respond immediately
after receiving a key stroke from you, you don't have to press <Return>.
In additon to Menu keys, there are additional options listed
at the bottom of the screen as well.
Now that you know how to start Pine, you can explore on your own,
or you can browse the rest of this document for a summary of
Pine's main features.
To read the online help anytime, use the Help command at the bottom of
each screen. For example, at the Main Menu screen, press
? (Help).
The help text is context sensitive meaning that you see only the
help that relates to the Pine feature you are using. To exit the
online help, press
E (Exit Help).
|
| |
-
-
At almost any place in Pine, press
q (Quit).
-
You will be asked to confirm: "Really quit pine?"
-
Press y
(yes) or press <Return> to quit.
|
|
Writing/Composing an e-mail in Pine
|
| |
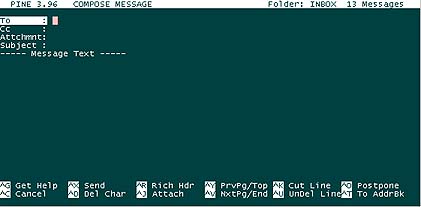
To write/compose an e-mail message, press
c
(Compose) in the Main Menu. You see the
Compose Message screen as shown below. In the command menu at the
bottom of the screen, the "^" character means you must hold down
the Control key while pressing the letter for each command.
For example, to move around, use the arrow keys or Control-n
(Next line) and Control-p (Previous line); to correct typing errors,
use <Backspace> or <Delete>. You can get the on-line help
on these commands any time by holding down the Control key and
press g
(Control-g). A Compose/Edit Command Key
Summary Tabel is also avaliable in this page.
To understand how Pine works, let's do an experiment by sending an
e-mail message to yourself. Your email address is your_login_ID@cee.odu.edu where your_login_ID is
the your user ID you use when you log in to one of CEE UCL workstations.
O.k., here's a list of steps to write and send a test e-mail to yourself:
(assuming no Cc: and no attachment elements in this e-mail)
-
- Press c
(Compose) in the Main Menu to open a Compose Message screen.
- In the To field,
type your email address and press <Return>.
- In the Cc field
(Corbon Copy), type other e-mail addresses who will receive
a copy of e-mail that you're composing now.
If you do not want to cc: to others, press <Return>.
- In the Attachment
field, press <Return>.
- In the Subject field,
type "This is a Pine Test" and press <Return>.
- Below the Message Text line, type "This is a test."
- To send your message, type
Control-x (Send).
- When Pine asks "Send message?,"
Press y
(yes) or press <Return>.
The e-mail message is sent and a copy is saved to your sent-mail folder.
(If you press n
(no), the message is not sent
out, and you can continue to work on it.)
This is how to compose an e-mail message and send out. Not bad, isn't
it? There are, of course, other options you can use as you compose a
message. Complete information about options for the Compose Message
screen is available in Pine's online help. You can type Control-g (Get Help) or ? at any time to see details about
available options.
Now, here's a list of detailed descriptions for those header fields for you;
-
| Header Field |
It Means |
| To: |
In this field, type the email addresses of your recipients.
Separate the addresses can be added with commas. When you are
finished, press <Return>. Always check the addresses in
both the To and the
Cc
fields for accuracy and completeness before you send a message.
You can also use alias(es) in both the To
and the Cc fields if you have
defined the alias(es) in the Address Book.
|
| Cc: |
Carbon Capy field.
In this field, type the email addresses of the persons to whom
you want to send copies. Separate their addresses with commas.
When you are finished entering addresses, press <Return>.
You can also use alias(es) in both the To
and the Cc fields if you have
defined the alias(es) in the Address Book.
|
| Attchmnt: |
This is an advanced Pine feature that allows you to
attach files, including word processing documents,
spreadsheets, or images that exist on your Unix account.
If you do not want to attach a file to your message,
just press <Return> to pass. For more information,
place your cursor in the Attchmnt field, then type
Control-g (Get Help) or
?
at any time.
|
| Subject: |
In this field, enter a one-line description of your e-mail.
A short, pertinent description is appreciated by
recipients, since this is what they see when they
scan their index of messages. When finished, press <Return>.
|
| Message Text: |
Type your message. This is so called e-mail body. To move around,
use the arrow keys. To delete a character, press <Backspace> or <Delete>.
You can get the on-line help on edit commands any time
by holding down the Control key and press "g" (Control-g).
A Compose/Edit Command Key Summary Tabel
is also avaliable in this page.
|
|
|
|
Sending out or Not sending, That is the Question
|
| |
To send an e-mail message after you're done with typing/composing
your message, type Control-x, and then
press y or
press <Return>.
Your e-mail message is sent out right away and a copy of
the sent-out e-mail is saved to the sent-mail folder.
If an e-mail message cannot be delivered for various reasons (such as
an incorrect reciepient e-mail address or a network problem),
it eventually is returned to you with a detailed error message,
so that you can correct the problem. If you want to re-send such
message, you can simply use the
f
(Forward) command to send it again instead of re-typing whole message again.
Here's one option I use a lot. Sending an e-mail for casual tasks,
you can always compose/type one on the fly without worrying too much.
However, if you're sending out any formal correspondence or long
reply, it is always a good idea to review it carefully before
sending it out. (Have you ever had those "Doh!!" situations?)
You can achieve this by postponing current e-mail message that
you've been working on, and work on it later again. To postpone, press
Control-o (Postpone).
Or you can type Control-c (Cancel) to
delete your e-mail message entirely. You'll be asked to confirm whether
or not you want to cancel the e-mail message in such case.
|
|
Listing, Viewing, Replying to, and Forwarding e-mails
|
| |
Pine stores messages that are sent to you (called "incoming messages)
in your INBOX folder by default. Messages remain in your INBOX until
you delete them or save them in other folders.
(You will learn more about dealing with the INBOX and other folders
in Managing Folders section.)
-
| To Do |
You Do Following Steps |
|
To see a list of
the messages you
have received in your INBOX folder:
|
- At the Pine Main Menu, press
i
(Message Index).
- If you have any messages, you will see them listed here in the Message Index.
- If you want to list the messages in a folder other than your INBOX,
see "Moving Between Folders" in Pine Folders section.
|
|
To view a message (=read an e-mail): |
- At the Pine Main Menu, press
i
(Message Index).
- At the Message Index screen, use the arrow keys
to highlight the message you want to view.
- Press v
(ViewMsg) or press <Return> to read a selected message.
- To see the next message, press
n (NextMsg).
- To see the previous message, press
p (PrevMsg).
- To return to the index, press
i (Index).
|
|
To reply to a message
that you have selected at the
Message Index screen or that you are viewing: |
- Press r (Reply).
- You are asked whether you want to include the original message in your
reply. Also, if the original message was sent to more than one person,
you are asked if you want to reply to all recipients. Think carefully
before you answer -- it may be that you do not want your reply to be
sent to more than just the author of the message.
- It is always a good idea to check the list of addresses in the
To: and Cc:
fields before you send a message to see who will receive it. Sounds
so simple, but believe me - you'd better check again!
|
|
To forward a message
that you have selected at the
Message Index screen or that you are viewing: |
- Press f (Forward).
- A copy of the message opens and the To field is highlighted.
- Enter the address of your recipient and send the message
as usual. Note that you can modify the original message if
you wish, for example, to forward only a portion of it or
to add a message or notes of your own.
|
|
|
|
What Your Message Index Screen Tells
|
| |
When you open your INBOX folder (by pressing
i
(Index) from the Main Menu), if the first column on the left is blank,
or shows a "+," when the message was sent
directly to you (i.e., it is not a Ccopy or from a list).
The second column may be blank, or it may contain:
- "N" if the message is new (unread),
- "A" if you have answered the message
(using the Reply command),
- "D" if you have marked the message
for deletion.
[Note: If you answer a message as well as mark it deleted (in either order),
you only see the "D."]
The rest of the columns in the message line show you the message
number, date sent, sender, size, and subject. For details, press
? (Help).
Most of the commands you need to handle your messages are visible
at the bottom of the screen, and you can press
o
(Other Commands) to see additional commands that are available.
You do not need to see these "other commands" displayed on the screen (i.e.,
the usual at the bottom of the screen location) to use them.
|
| |
When you save an e-mail message, you will be given a choice:
you can store it to the default "saved-messages" folder,
or you can specify another folder of your choice (if the folder
already exists).
Once you saved an e-mail message, the copy in your INBOX
folder automatically is marked for deletion so that you
only will have one copy in the folder where you saved the e-mail
message to. When you quit Pine, you are asked to confirm whether
or not you want to expunge the copy from the INBOX folder.
To conserve space in the system e-mail directory, please do so.
-
|
To save an e-mail message to the default "saved-messages" folder:
|
-
At the Message Index screen, use the arrow keys to highlight
the message you want to save, or, at the Text screen as you're reading an e-mail message;
-
Press s
(Save). You are asked
if you want to save the message to the default "saved-messages"
folder or to another folder:
SAVE to folder in [saved-messages] :
-
Press <Return> to choose the default folder: [saved-messages].
Pine will save your message to the default folder: [saved-messages].
-
|
To save an e-mail message to a folder you specify:
|
-
At the Message Index screen, use the arrow keys to highlight
the message you want to save, or, at the Text screen as you're reading an e-mail message;
-
Press s
(Save) to save a message.
You are asked if you want to save it to the default "saved-messages"
folder or to another folder:
-
Type a foldername and press <Return>.
For example, to save a message to a folder named "project", type 'project'
(without the single quotes) and press <Return>. If there is
no folder named "project," Pine will ask you whether you want to create a
folder "project": press
y or
press <Return> to create the folder.
Once you have created a folder, or whenever you type the name of a
folder that already exists, you will see a message confirming
that your e-mail message has been copied to that folder and
deleted from the INBOX.
|
|
Deleting an E-mail Message
|
| |
You should keep your Pine folders clean by routinely deleting
e-mail messages you do not want. There are two steps to deleting
an e-mail message: marking it for deletion (=delete it later when you quit
Pine) and expunging it (=delete it right now).
-
|
To mark an e-mail message for deletion
|
-
-
Select and open the folder that contains the message you wish
to mark for deletion. If you are a Pine beginner, this message
is probably in your INBOX folder. If the message you want to
mark for deletion is in a folder other than your INBOX,
see "Moving E-mail Messages Between Folders" section.
-
At the Message Index screen, select the message you want (either using arrow keys
or p
(Previous) and n
(Next) keys) to mark for deletion, or simply view the message.
-
Press d (Delete).
-
If you are looking at the Message Index screen when you mark
a message for deletion, a "D" appears
in the left column of the message line, and the next message,
if there is one, is selected.
-
If you are looking at the Message Text screen when you mark
a message for deletion, a "DEL"
briefly appears in the upper right corner of your screen, you
get an on-screen message that the message has been deleted,
and the next message, if there is one, appears.
-
Repeat this process to mark additional messages for deletion.
-
|
To undelete an e-mail message
|
-
Well, nobody's perfect. If you change your mind about an
e-mail message you have
marked for deletion, use the
u
(Undelete) command to remove the deletion mark any time
before you expunge them. Remember, after
you expunged, Pine cannot get those e-mails back.
-
|
To expunge an e-mail message
|
-
An e-mail message that is marked for deletion remains in Pine until
you expunge it. You can expunge a message that is marked for deletion
at any time, or you can wait until you quit Pine. Once you have a
few messages marked for deletion, you may want to expunge them
before you continue to work, because it is easier to look through
an index that contains fewer messages.
Warning: Once you expunge an e-mail message, it is gone. Pine cannot get it back.
To expunge an e-mail message
-
At the Message Index screen, press
x
(eXpunge). You are asked to confirm your decision to expunge.
-
Press y
(yes) or press <Return>.
Messages marked for deletion disappear.
-
Also, you will be
asked whether you want to expunge messages that are marked
for deletion whenever you leave a folder (other than the
INBOX) that contains messages marked for deletion, or
when you quit your Pine session
|
|
Managing your Pine Folders
|
| |
E-mail messages can quickly accumulate in your INBOX folder.
If you "live-and-die" with e-mails, you soon could have hundreds.
Especially, e-mail messages in your INBOX folder will remain
indefinitely in the CEE Unix network system mail directory (/var/mail)
regardless of whether you read them already or not, as long as you do not delete
them from your INBOX folder. You may say "so what?," however
the disk space allocated to the system e-mail directory is a
finite one as you know ver well, and this system e-mail directory
is shared by all CEE Unix network users.
Now, let's think about a worst case scenario. A user "Imhog" has
been keeping all his old e-mails in his INBOX folder over years,
and many contain huge attachment(s), something like 4.5 MB just
by each attachment size along. However the user "Imhog" never
had deleted any of his old e-mails. One day, "Imhog" received
another huge e-mail with a number of big attachments (let's say
another 10 MB) from his friend, and that e-mail exhausted all
remaining space in the system e-mail directory.
What happens next will not be a laughable matter. Since all system
mail directory (/var/mail) was used up, no single incoming e-mail
would be received by the CEE network server regardless of
which reciepient it supposes be (not to mention a user "Imhog").
Now, due to one careless user, all other users in CEE network would
be affected - not able to receive valuable e-mail communications
and the original senders in other sites would scratch their heads
over the unrealistic error message e-mail bounced from CEE server
saying "Not able to accept your e-mail..."
O.k., now I admit that I'm exaggerating a bit. But you get the point.
First of all, the system mail directory was allocated to a decent size
so that you'll not have any sudden surprise. Secondly, size
of unread e-mail files for all CEE users in the system mail directory
are constantly monitored so that whenever the remaining space of
system mail directory is getting too low, you top 10 "e-mail hogs"
will recieve an automatically generated warning e-mail from me
saying nicely "please delete or save old e-mails."
What you need to do is to delete e-mail messages you do not want,
and use "folders" to organize messages you wish to save.
A folder is a collection of one or more e-mail messages that are
stored so you can access and manage them.
This is just like a subdirectory tree structure in your Unix account.
-
|
To mark an e-mail message for deletion
|
-
You can organize your email messages into different folders by topic,
correspondent, date, or any other category that is meaningful to you.
You can create your own folders anytime you want to. By default,
Pine automatically provides following three folders when you start
Pine for the first time.
| Folder Name |
It Stores |
| INBOX |
Incoming e-mail messages sent to you.
When you first start Pine and go to the
Message Index screen from the Main Menu
( i , you are looking
at the list of e-mail messages in your INBOX folder.
Every incoming e-mail message remains in your
INBOX until you delete it or save it in another
folder. Read you're e-mails, and either delete
them or save them to other folder.
|
| saved-messages |
Copies of e-mail messages you save are stored in this folder by default
unless you save them to other folders that you create yourself.
See Saving a Message.
|
| sent-mail |
Copies of e-mail messages you send out are stored in this folder
by default. This is convenient if you cannot remember whether
you actually sent an e-mail and want to check, or if you
want to send a message again without typing it again.
|
|
-
|
Good Housekeeping - Keeping Folders Clean |
-
E-mail Messages -- whether they are in your INBOX or your other Pine folders --
occupy storage space, and your storage space is limited. Here's a list
of items that you might consider;
- Check your email frequently to see if you have new messages.
- Do not keep too many messages in your INBOX folder. A large
INBOX reduces performance: it takes longer to display
large lists of messages when you start Pine, and it
requires more time to move between messages.
- Delete your incoming messages right away if you do not
want them, or save them to other folders if you do.
- Routinely delete obsolete messages from all of your Pine folders.
- You will get a message via Pine at the end of each month
asking you about your sent-mail folders. First it
asks you if you want to rename (and thus save) your
current sent-mail folder. Then it asks if you want
to delete any sent-mail folders (and all the
messages they contain) from previous months and the
current month. To conserve space, it is a good idea
to delete any sent-mail folders you do not want
|
| |
-
- Press
l
(List Folders). You see
the Collection List screen. Highlight the collection
you want and press <Return>. You see a list of folders.
- To add a folder, press
a
(Add).
You are prompted for the name of a folder.
- Type the folder name and press <Return>.
Your folder name appears. You might want to add
a couple of test folders so you can practice deleting folders.
|
| |
-
- Press
l
(List Folders). You
see the Collection List screen.
- Use the arrow keys to highlight the collection
you want and press <Return>.
- You see an expanded list of your folders in which
your current folder is highlighted. (When you
start Pine, the current folder is your INBOX.
You cannot delete your INBOX.)
- Use the arrow keys or
p
(Previous Folder) and
n
(Next folder) to highlight the folder you wish to delete.
- To delete the entire folder of messages,
press d
(Delete).
- You are asked: Really delete "folder"?
- Press y
(yes) if you want
to delete the folder and all of its messages. The
folder will disappear.
[Warning: There is no way to undelete a deleted folder.]
|
|
Moving E-mail Messages Between Folders
|
| |
From almost anywhere in Pine, you can press
l
(List Folders) to see a collection list of your
folders. Of course, the folder you are most often interested in
is your INBOX folder, the folder that contains your new e-mail messages.
When you start Pine and press
i (Index)
at the Main Menu, you see a list of messages in your INBOX folder.
If you want to see the messages in another folder, you need to go
to that folder.
There are two different ways to go to another folder
from nearly anywhere in Pine.
-
|
To access your folders and the messages that are stored in them:
|
-
- Press
l
(List Folders).
You see the Collection List screen with collections of folders.
- If it is not already highlighted, use the arrow keys to
highlight the Mail line and press <Return>.
You see an expanded list of folders in which
your current folder is highlighted.
- Use the arrow keys or
p (Previous)
and n
(Next) to highlight another folder.
- To see an index of the messages in that folder,
press >
(View Folder) or press <Return>.
This method of accessing folders uses the Folder List screen,
which has a menu of commands that enable you to add, delete,
rename folders, etc. If you simply want to move to and list
the messages in another folder, try the method below.
-
|
To move most quickly to the index of another folder:
|
-
- l (List Folders).
You see the Collection List screen with collections of folders.
-
From almost anywhere in Pine, press
g
(Goto Folder). You are prompted for the name of a folder.
If you have more than one folder collection defined,
observe the prompt to make sure it is set for the desired
collection (shown in brackets in the prompt).. If the
prompt is set incorrectly, type Control-n (Next Collection)
or Control-p (Prev Collection) to select the desired collection.
-
Type the folder name and press <Return>, or simply press
<Return> to chose the default folder shown in brackets
in the prompt.
If you are a beginner with Pine, you probably have not
created additional folders yet. You can learn how in
the Saving a Message section.
- Press <Return>. You see the list of messages in that folder.
|
| |
To print an e-mail message
-
-
From either the Message Index screen or the Message
Text screen,
press either % or
y (prYnt).
-
Confirm whether you really want to print the e-mail message.
To confirm, press press y (yes).
By default, the e-mail message will be printed on HP LaserJet4
printer in the CEE UCL.
-
For additional information, you can take a look at the on-line help
by pressing Control-G.
|
|
Using Pine's Address Book
|
| |
As you use e-mail, you can build a list of your regular e-mail
correspondents in your Pine Address Book. At the Pine Main Menu,
press
s
(Addressbook) to see the
Address Book List screen. Your personal addrees book,
".addressbook", will be highlighted. Press <Return>.
This ".addressbook" is a standard ASCII text file and is
located in your login directory, i.e., "/home/Your_login_ID/.address."
You can use the address book to store e-mail addresses for individuals or
groups, to create easily remembered "nicknames" for these
addresses, and to quickly retrieve an e-mail address when
you are composing a message.
There are two ways to add e-mail addresses to your address book:
(a) you can add them by taking them directly from e-mails
you received, and (b) you manually create address book enties
for each e-mail address.
A single address book entry (or nickname)
can point to just one e-mail address, or, it can point to
more than one. When it points to more than one,
it is called a "distribution list." Each distribution list
has a nickname (that you can refer easily), a full name,
and a list of e-mail addresses. These addresses may be
actual addresses, other nicknames in your address book,
or other distribution lists. It is an extremely flexible
and convenient to manage many e-mail addresses, either
correlated or independent.
-
|
To manually add single address or a distribution list
|
-
-
Have ready the address or addresses you want to add.
- At the Pine Main Menu, press
a
(Address Book). You'll see your personal
Address Book List screen.
- Press <Return>.
[Note: If you need general information about using the
Pine address book, this is the best place to get it.
Press
? > (Help).
- Press
a (Add New) and
follow the instructions.
(Type Control-G if you need help specifically to add a new address.)
-
|
To take a single address from an e-mail message
|
-
-
At the Message Text or the Message Index screen,
press t (Take Address).
The t
command is not visible on
your screen unless you press
o (Other Commands), but
you need not see this command to use it.
- You see the Take Address screen.
- If there is more than one address to take, you see this message:
[Single mode: Use "P" or "N" to select desired address]
- Use
p (Previous),
n
(Next), or the up and down arrow keys to select the address
you want, and press
t (Take Address).
At this point, or, if there is only one address to take, you
see this message:
Enter new or existing nickname (one word and easy to remember):
- Enter a nickname for your correspondent and press <Return>.
- Follow the instructions. (Type Control-G if you need help.)
-
|
To take multiple addresses from an e-mail message
|
-
-
At the Message Text or the Message Index screen,
press
t (Take Address).
The t
command is not visible on
your screen unless you press
o (Other Commands), but
you need not see this command to use it.
- You see the Take Address screen with following message.
[Single mode: Use "P" or "N" to select desired address]
- Press l (ListMode).
- For each address you want to take, use
p
(Previous), n
(Next), or the up and
down arrow keys to select it, and then press
x
(Set/Unset) in the box to its left.
- Press t (Take).
You see the following message:
Enter new or existing nickname (one word and easy to remember)
- Enter a nickname for your list of correspondents and press <Return>.
- Follow the instructions. (Type Control-G if you need help.)
-
|
To change a single address or a distribution list
|
-
-
At the Pine Main Menu, press a (Address Book)
and then press <Return>. You see your personal Address Book screen.
- Use the arrow keys to select the single address or
distribution list you want to change.
- Press v
([View/Edit]).
- Press
u
(Update), then use arrow
keys to get to the field when you want to make a change.
Follow the instructions. (Type Control-G if you need help.)
-
|
Getting e-mail address(es) from Address Book when composing an e-mail
|
-
For To: or the Cc:
(Carbon Copy) fields in an outgoing e-mail message, you can enter an e-mail address
in any of the following ways;
- Type the entire e-mail address manually.
- Type a nickname you have set up in the address book.
- Select a name (or names) from the address book as you compose a message:
- To send an e-mail message to one person
- Place your cursor in the To: or
Cc: field and then type
Control-t (To Address Book).
- Use the arrow keys to highlight the name you want.
- Press
s
(Select) or press <Return>.
- To send a message to several people
- Place your cursor in the To:
or Cc: filed and then
type Control-t (To Address Book).
- Type
l (List Mode).
- Using the arrow keys, place an
x
before each name you want.
- Press s
(Select) or press <Return>.
|
| |
When you send a Pine e-mail message, there are two ways to include a file -
insert it or attach it. Which method you use depends on the type of file
you want to send, the e-mail program used by the recipient.
-
|
What kind of file do you want to send?
|
-
Before you send a file via Pine, you need to know whether it is a plain
text file or a non-text (=binary) file. Then you need to decide whether
you want to include the file as part of the text you compose or as an
attachment to your e-mail message. Only plain text files can be
included in your e-mail composition, but any kind of file, text or
non-text, can be sent as an attachment.
If you're not so sure what kind of file you're dealing
with, you can use "file"
command first to determine file type.
- Plain Text File
-
Plain text (also called ASCII) files are created by
text editors such as Pico, vi, emacs, nedit, etc.
You can also save a word processing document as a plain
text file. This maintains the document's basic page layout but
removes most other formatting from the document. For
example, to save a Microsoft Word document as a plain
text file, save it as "Text Only with Line breaks."
- Non-Text (=binary) File
-
Non-text files, in contrast, include word processing documents saved in
their native formats, spreadsheets, audio files, graphic files, and
executable binary programs. If a file isn't explicitly saved as plain text
or created by a simple text editor, chances are it's non-text.
-
|
What kind of e-mail program is used by the receipient?
|
-
Once you know what kind of file you want to send, you need to find out
what kind of e-mail program your correspondent is using. Why is this?
Well, most e-mail programs can understand and display plain text files.
But that's not always the case with non-text files. Not all e-mail
programs can handle non-text files.
Some e-mail programs use a non-standard or a proprietary method for sending
and receiving non-text files. However, with the popular adoption of a
standard called MIME (Multipurpose Internet Mail Extensions),
there is hope that the same method will be
incorporated into all email programs.
The best way to find out whether your correspondent's e-mail program is
MIME-compatible is to ask them.
-
|
Preserving the format of any file
|
-
Using MIME attachments is a good way to send a document,
even if it's plain text. The method of inserting
files directly into e-mail messages (usually by
"copy" and "paste") can introduce stray characters into the
document. For instance, if a line beginning with the word "From" is
inserted into an e-mail message, certain Unix mail delivery programs add a
> symbol, so that the line would start, ">From..." Although this is a
minor alteration, attaching files guarantees that their
original formats remain unchanged.
-
|
O.k., then tell me what method should I use to send a file in Pine?
|
-
Here's a matrix that you may consider when you're sending a file in Pine.
| |
Plain Text Files |
Non-Text Files |
| Insert |
- Any email program can accept embedded plain text files.
- Quick and easy way, i.e., "copy" and "paste," of
sending a file without worrying about
reciepient's MIME capability.
- Some e-mail specific keyword/reserved word can introduce errors into text.
|
- Non-text files cannot be inserted in mail messages.
- Sometimes a non-text (=binary) file can be converted
to plain text first by using
uuencode
and then uuencoded text file can be inserted directly
to the e-mail body. In this case, the reciepient
should be able to uudecode
your uuencoded e-mail message back to the
original non-text (=binary) file.
|
| Attach |
- Useful for sending more than one file.
- Errors will not be introduced in text.
- Good for large files.
- Only MIME-compatible e-mail programs can handle
attached files.
|
- Useful for sending more than one file.
- File can be sent in its original format without translation.
- Related attachments (e.g., image and audio to your presentation) can be sent altogether.
- Only MIME-compatible email programs can handle attached files.
|
|
|
|
Important Tips When you're Sending Files
|
| |
Text files can be included in any e-mail message.
In addition, the Pine supports the Internet protocol
for multimedia attachments (MIME). Word processing documents,
spreadsheets, programs, images, even audio, can be
attached to your messages using this facility.
Some important items you should remember when you're
sending files as MIME attachments in Pine:
- If you're asking someone to send you a formatted/document file,
tell them specifically what format you want to receive, i.e.,
"Microsoft Word" or "Adobe ESP," etc.
- When you're sending someone a formatted/document file,
always tell them in the *body* of the your e-mail message about
the *format* of the attached file -- give the name *and*
version of the program that created the file.
- If you are attaching more than one file, give the filename
and format for *each* attached file -- program name and version.
- If you are sending a word-processing document file, to ensure
the best chance of the recipient being able to use it,
save the file from your word-processing program as
"Rich Text Format (RTF)". RTF files can be read by
most word processing programs in all platforms with
minimal loss of the original formatting. For example,
use RTF to transfer files from a recent version of
MS Word to an older version of MS Word (or to
WordPerfect or another word-processing program).
- For spreadsheet, graphic, or other formatted files; ask
the recipient what program they will use to process
the file; you may have to save it in a format
acceptable to their programs. It may take some
ingenuity to find a format which you can create,
and the recipient can use.
- To receive an e-mail message with a MIME attachment, the
recipient must be using Pine or some other e-mail
program that supports MIME.
|
|
Receiving/Saving Files (=Attachments) from an E-mail
|
| |
When you receive an e-mail containing an attachment,
you can save the attachment to a file. Once you've
saved the attachment, you can use the file on your
account or download the file to PC.
Some important items you should remember when you're
sending files as MIME attachments in Pine:
To save an attachment as a file:
- Select the message containing the attachment from Pine's Folder
Index screen and type
v (View)
or press <Return> to view it.
- From the Message Text screen, type
v
to "ViewAttchment."
Pine lists any text in the body of the email message as attachment
number one. All subsequent attachment numbers are the files that
have been attached to this message.
- Now, from the "Attachment Index" screen select the appropriate
attachment.
- When you have selected the attachment you want to save, type
s
to "Save" the attachment to a
file on your account.
(Note that you can also select "View" in some cases, but this
depends on the type of file and the setup of the system you are
using.)
- At the "Copy attachment to file in home directory:" prompt, you
can either:
- Type a filename for the attachment.
or
- Type nothing.
By default, Pine will use the attachment's original filename.
- Press <Return>. Pine saves the attachment as a file.
|
|
Pine Compose/Edit Command Key Summary
|
| |
| To do This |
Use |
| Display help text. |
<Ctrl> g |
| move Forward a character. |
<Ctrl> f |
| move Backward a character. |
<Ctrl> b |
| move to the Previous line. |
<Ctrl> p |
| move to the Next line. |
<Ctrl> n |
| move to the Beginning of the current line. |
<Ctrl> a |
| move to the End of the current line. |
<Ctrl> e |
| page Down. |
<Ctrl> v |
| page Up. |
<Ctrl> y |
| Search for (=where is) a string/text, not case sensitive. |
<Ctrl> w |
| Refresh the display. |
<Ctrl> l |
| Delete a Character at the cursor position. |
<Ctrl> d |
| Delete a Line at the cursor position. |
<Ctrl> k |
| Block select (for copy/delete) - Mark cursor position as beginning of
selected text. It works like a toggle -
setting mark again will unselects a text block. |
<Ctrl> ^ |
| Cut/Copy selected text (displayed in inverse characters).
'Cut' means you are putting selected text into
the memory buffer for later 'paste' compared to
'delete.' Of course, if you do not 'paste,'
it becomes equivalent to 'delete.'
|
<Ctrl> k |
| Uncut (=Paste) last cut text inserting it at the
current cursor position. |
<Ctrl> u |
| Insert a Tab at the current cursor position. |
<Ctrl> i |
| Format (justify) the current paragraph. |
<Ctrl> j |
| To start the spelling checker |
<Ctrl> t |
| Report current cursor position (in line/column format). |
<Ctrl> c |
| Insert an external file at the current cursor position. |
<Ctrl> r |
| Output (=Save) the current buffer to a file. Equivalent to 'Save As.' |
<Ctrl> o |
| Exit pico. Pico will automatically ask whether
you want to save the buffer if any modification was made. |
<Ctrl> x |
|
Pine and Pico are trademarks of the University of Washington.
|
|
|